I’ve been thinking about trying out a cluster compute home-build for a while now, but have never quite got around to it. The recent launch of the new Raspberry Pi 2 has given me the impetus, and so this weekend I got building.
The Build
The physical assembly of the cluster is pretty straightforward: I ordered four Pi’s, and laid them out on an A4 sheet of perspex, drilled the requisite holes for standoffs for mounting the boards, and then laid a second sheet of perspex over the top, mounted with slightly longer stand-offs.
Although I could aim for a higher density (perhaps as high as 8 Pi’s per A4-sheet – the limiting factor is the cable access), this cluster is really just a proof-of-concept for me, and a learning experience with some of the technologies. The cluster is also stackable in as much as I can repeat the same layout on further perspex sheets if I want to extend the cluster further.
The only element of careful consideration was in providing the power to the Pi’s. I did look carefully at powering the 5V rail via the GPIO port and some custom electrics, however doing so would circumvent the protection provided by the standard micro-USB power socket. Instead I found a decent 6-port, 10-Amp USB power supply that can send close to 2A to each Pi, which is enough to cater even for scenarios where I have power-hungry peripherals hanging out of the cluster (not my plan, but who knows what the future holds).
I also made use of an unmanaged gigabit switch I had lying around to hook up all of the Pi’s. In future I’ll probably replace this with a managed switch or router of some description so that the cluster is a little more isolated from my core network, and also to give me a playground to learn a little more about network configuration, etc. Storage for the Pi’s was provided courtesy of some SANDisk 8GB Micro-SD cards, which conveniently came with a regular-SD adaptor for easy flashing in my Mac. My only gripe is that the SD cards were strictly 8GB in size (SI Units), rather than 8GiBi in size. Given that the common vernacular is that 1GB=1GiBi I do feel somewhat shortchanged.
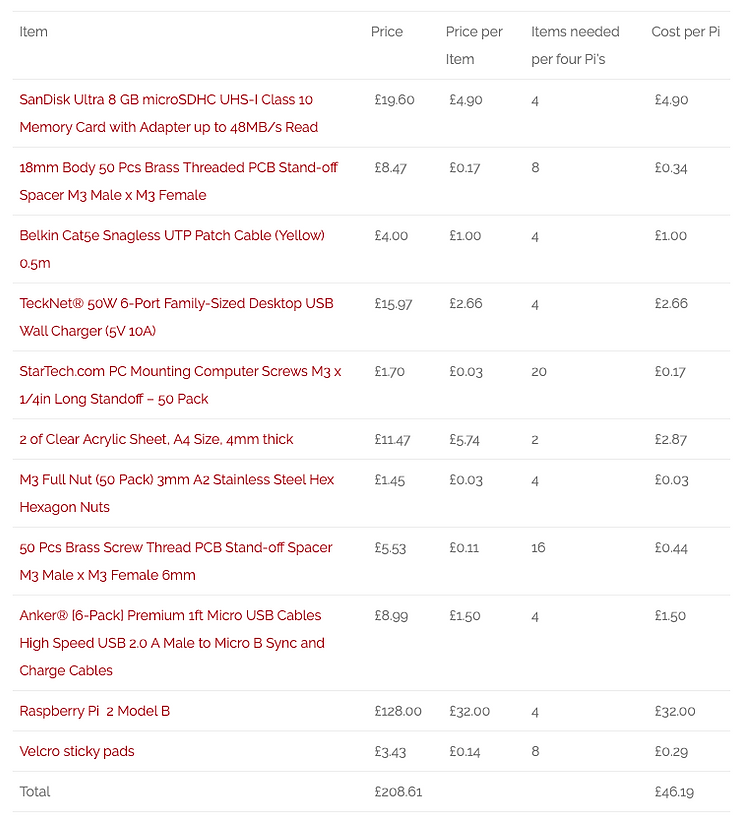
Shopping List:
The Setup
I setup each SD card on my Mac with Raspian as an OS, available on the Raspberry Pi website here: http://www.raspberrypi.org/downloads/
I may switch to something lighter-weight in future, like a custom build of ArchLinux, but that’s for another day.
To flash the SD card, do the following (assuming you are on a Mac):
diskutil list
Identify the disk (not partition) of your SD card e.g. disk4 (not disk4s1):
diskutil unmountDisk /dev/<disk# from diskutil>
e.g.
diskutil unmountDisk /dev/disk4
then:
sudo dd bs=1m if=image.img of=/dev/DISK
e.g.
sudo dd bs=1m if=2015-02-16-wheezy-raspbian.img of=/dev/disk4
This last command can take a while – ~35mins for me – and there’s no visible output until it completes and tells you how many bytes were written, so just be patient!
Although I could have configured one Pi node, and then cloned it repeatedly, and although that is what I will probably do if I add further nodes to the cluster, to get up and going I simply repeated the above steps for each SD card.
The final steps are straightforward: whack the SD cards into the Pi’s and power up. A quick glance at my router to see the IP’s used, and I SSH’ed to each node in turn to configure it.
There are only a handful of simple configuration steps required, but these need to be done on each node:
1. Run raspi-config to do base-level configuration.
sudo raspi-config
This offers a menu-driven approach to changing the hostname and enabling the SSH server on a permanent basis, which are the only two changes I made to start with. Also within raspi-config you can configure overclocking (something I will come back to when I can benchmark my cluster performance), as well as memory allocation for graphics, and various other miscellany.
2. Setup SSH so you can conveniently jump around and copy files between nodes as needed:
ssh-keygen
Accept the defaults, and don’t bother with a passphrase.
I named my 4 nodes pi1, pi2, pi3 and pi4 and assigned them each an IP address from 192.168.1.201-204. You will have to update the instructions below to match your own configuration.
From each node, you will need to copy the public key you just generated to the “authorized keys” file on the other nodes. If you first create the keys on each node it will create the folder ~/.ssh for you, otherwise you will need to do this on each node before you try and copy the public key across. For example on pi1 (192.168.1.201):
cat ~/.ssh/id_rsa.pub | ssh pi@192.168.1.202 'cat >> .ssh/authorized_keys'
cat ~/.ssh/id_rsa.pub | ssh pi@192.168.1.203 'cat >> .ssh/authorized_keys'
cat ~/.ssh/id_rsa.pub | ssh pi@192.168.1.204 'cat >> .ssh/authorized_keys'
When you do this on each node, the first time you connect to another node SSH will ask you to accept the destination-node’s fingerprint and will add it to the known-hosts file.
3. Download various other packages that will be needed later:
sudo apt-get update
sudo apt-get install python-dev
sudo apt-get install python-pip
sudo apt-get install mpich2
This last package is an implementation of MPI – Message Passing Interface – which is the first approach I will be taking to make use of the cluster’s overall compute power.
4. Next download the mpi4py package which will enable the Python usage of MPI:
wget https://bitbucket.org/mpi4py/mpi4py/downloads/mpi4py-1.3.1.tar.gz
Note: although you can install mpi4py directly using pip, this in turn installs a different implementation of MPI, called OpenMPI, which I could not get to run successfully on the Pi’s. Unpack mpi4py, and build and install it:
gunzip mpi4py-1.3.1.tar.gz
tar -xf mpi4py-1.3.1.tar
cd mpi4py-1.3.1
sudo python setup.py build
sudo python setup.py install
5. Testing MPI and mpi4py:
All should now be setup and ready to test. mpi4py comes with some useful tools, but for now we’ll stick to the most basic “hello world” example to prove that the cluster is up and running and the nodes can communicate with each other.
First change to the demo folder:
cd ~/mpi4py-1.3.1/demo
Next create a file that contains the IP’s of the various nodes: nano machinefile E.g. my machine file:
pi@pi1 ~/mpi4py-1.3.1/demo $ cat machinefile
192.168.1.201
192.168.1.202
192.168.1.203
192.168.1.204
Note: you only need to do this on one node, the ‘master’ node.
You can then run the helloworld.py program:
pi@pi1 ~/mpi4py-1.3.1/demo $ mpiexec -f machinefile -n 8 python helloworld.py
Hello, World! I am process 0 of 8 on pi1.
Hello, World! I am process 4 of 8 on pi1.
Hello, World! I am process 1 of 8 on pi2.
Hello, World! I am process 6 of 8 on pi3.
Hello, World! I am process 5 of 8 on pi2.
Hello, World! I am process 3 of 8 on pi4.
Hello, World! I am process 7 of 8 on pi4.
Hello, World! I am process 2 of 8 on pi3.
the -f parameter tells mpiexec where to find the nodelist, and the -n tells it how many nodes to run. In this example the processes get split up 2 to each node.
Conclusion:
So – that’s as far as I’ve got so far – a working MPI cluster. Pretty sweet! Next I plan to conduct some benchmarking stats, timing some sample operations, etc, and seeing how they scale across nodes, and from there learn a little of how MPI works and how to make use of it for some custom applications.